It’s been a while since I last posted, so forgive me if my words seem a little rusty. And no, I haven’t forgotten the whole debate thing, but when I have a recipe that really excites me, I don’t want any distraction – I just want to get it on the table.
As many of you know, dessert-for-breakfast is a pretty standard card on my table. From apple pie, to pain au chocolat, to honey kasutera, and black sesame tang yuan – you see why I have no trouble waking up each morning.
This week, it’s been brownies. The first batch had crisp, crumbly edges and a dense interior. I ate these for breakfast for five days straight, and they were fine, but far from perfect. They were a little too tall, a little too crumbly, and they didn’t have the shiny craggle-top. So I changed a few things – same ingredients, same measurements, different technique, and these came out.
I tried to give as much detail as possible and as much reasoning as possible to demystify what makes a ‘perfect’ brownie and in a way that you’d remember. And by the way, these are gluten free – not because I was trying to go for a GF recipe, but because I love the combination of dark chocolate and buckwheat, and believe it or not, I find it much easier to work with.
“I have always loved you,”
says the Lord.
Malachi 1:2
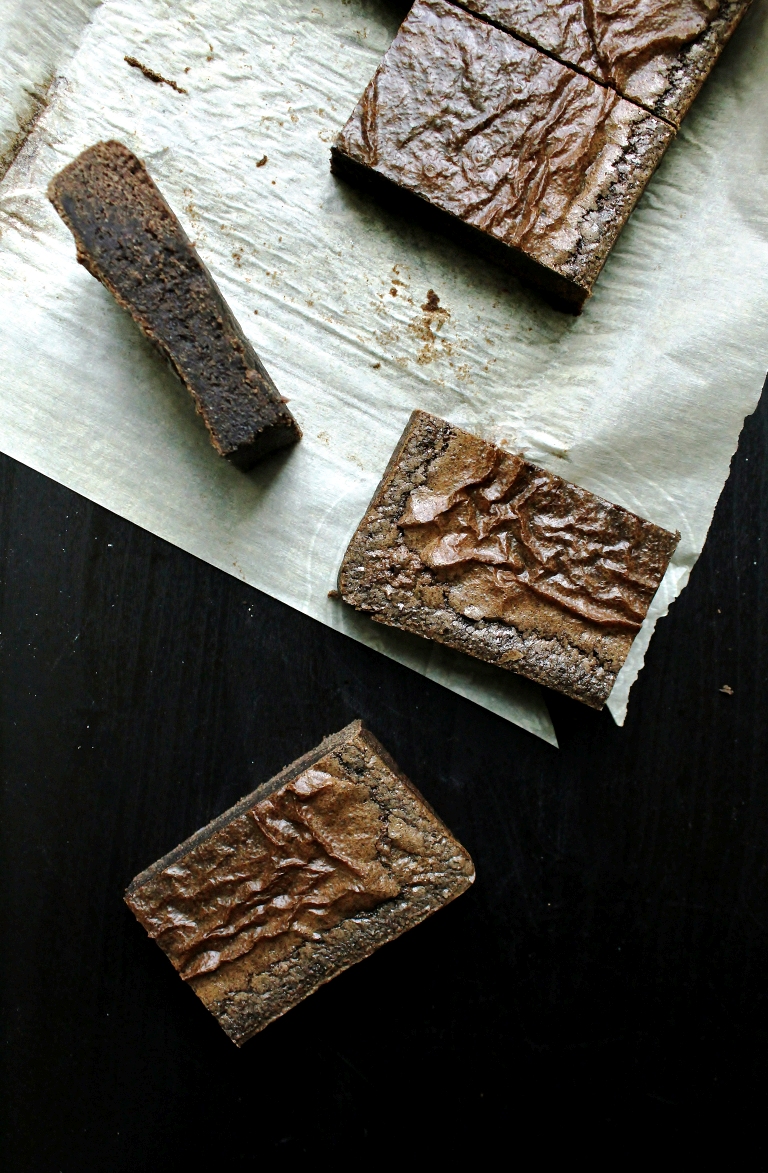
Dark Chocolate Buckwheat Brownies – makes 1 8 by 8 inch slab
- 4 free range eggs, at room temperature
- 180 ml packed golden sugar
- 1/2 tsp fine sea salt
- 60 ml olive oil
- 125 ml unsalted butter
- 300 ml chopped dark chocolate or dark chocolate chips
- 240 ml buckwheat flour
- Place the eggs, sugar, salt, and olive oil in a mixing bowl and beat with a fork until the sugar is dissolved. Set aside. (Using a fork instead of a whisk or electric beaters will minimize the amount of air incorporated into the batter, giving you denser and fudgier brownies. The dissolved sugar that binds with the egg forms a skin as it dries during the beginning stages of baking – similar to the smooth shell of macarons.)
- In a small saucepot, melt the butter over medium low heat, swirling occasionally. As soon as the butter is melted, add all of the chocolate and turn off the heat. Let the mixture sit for 30 seconds, then stir gently for about 2 minutes until the chocolate is completely melted and the mixture is smooth. (Butter melts at 35°C, and chocolate melts at 30°C. Since the eggs only coagulate at around 60°C, you should have no problem combining the two directly.)
- Pour all of the chocolate mixture into the egg mixture and mix with a fork until smooth and shiny. Add all of the buckwheat flour and fold it in gently with a fork, making sure you get rid of any lumps. (The finished batter should be smooth, shiny, and considerably runny for a brownie. Don’t worry, it only seems very runny because it has tons of melted fat and un-coagulated protein.)
- Line an 8-by-8 inch square baking pan with parchment extending up the sides and pour in the batter. Tap it firmly against your counter for 5-7 times to get rid of any air bubbles. (Air bubbles will rise to the surface during baking and break the craggly skin you want.)
- Allow the mixture to rest for 20-30 minutes as you preheat the oven to 325°F, placing the rack slightly above the middle of the oven. (Most recipes will give 350°F as the temperature setting, but the same ingredient transformations such as proteins denaturing, sugars rearranging, and starches gelatinizing can all happen at a lower temperature. In addition, the low temperature ensures that the cooking is more even since heat travels through mediums at a constant speed regardless of the difference between the surrounding temperature and the medium’s temperature, and a slower and lesser rise which will not disturb the delicate wafer-thin skin that forms at the top nor turn the brownie cake-y.)
- Bake for 28-30 minutes, or until the middle is puffed up, shiny, but still jiggles when you shake it gently. (The middle only puffs up because the moisture there is heated through, becoming steam which rises, but it is still wobbly which means that the starches haven’t completely expanded and set up. In other words, it’s cooked but not over-baked.)
- Place directly on the counter and cool to room temperature. If you would like, now is the time to sprinkle on some fleur de sel – while it’s hot and still giving off steam so it sticks. (You want to cool the brownie down as quickly as possible so that the center stops cooking immediately, contracts back down, and turns the smooth shiny skin into the craggle-top. Air is a poor conductor of heat, so cooling it on a rack is about as ineffective as you can do. If you have a marble countertop that is the best way to go.)
- Chill completely in the refrigerator, uncovered, for about 2 hours. Once chilled, lift the brownie slab from the pan by holding the extended sides of parchment. Cut into 4, 6, 8, 9, 12, or 16 slices – whatever you fancy. I like to cut them into 6 pieces, makes the perfect breakfast size for me. (Chilling the brownies before slicing solidifies the butter and chocolate fats, giving you cleaner edges.)
You can bring them back to room temperature to serve once you’ve cut them, pop them in the microwave for 30 seconds so they get all gooey, or have them straight from the fridge. I prefer the last one.
Now, how many brownie points did I just earn?

Very delicious recipe 😊
I’m so glad you made and enjoyed it! Thank you 😄